Quantcast
Channel: ZK Core – The ZK Blog
Viewing all 77 articles
Browse latest View live

ZK 6.0 New Feature Highlight Part 3: Datebox/Timebox Input Shortcut

$
0
0

This blog post is the third in a series which introduces more new features of ZK 6. For the main features please click here.

In ZK 6.0, we introduce a new simple feature on Datebox and Timebox: with a javascript handler specified in zk.xml, you can provide text shortcuts on date and time input.

Here is a demo video:


As shown in the demo, we can register the handlers like the following:

zk.xml

<?xml version="1.0" encoding="UTF-8"?>
<zk>
    <!-- The value of unformater is a javascript function -->
    <library-property>
        <name>org.zkoss.zul.Datebox.unformater</name>
        <value><![CDATA[
            function (val) {
                var today = new Date();
                if (val == 't')
                    return today;
                var c = val.charAt(0),
                    dt = new Date();
                if (c == '+') {
                    dt.setDate(today.getDate() + parseInt(val.substring(1)));
                    return dt;
                }
                if (c == '-') {
                    dt.setDate(today.getDate() - parseInt(val.substring(1)));
                    return dt;
                }
                return null; // use default Datebox parsing
            }
        ]]></value>
    </library-property>

    <!-- The value of unformater is a javascript function -->
    <library-property>
        <name>org.zkoss.zul.Timebox.unformater</name>
        <value><![CDATA[
            function (val) {
                var today = new Date();
                if (val == 'n')
                    return today;
                var c = val.charAt(0),
                    dt = new Date();
                if (c == '+') {
                    dt.setHours(today.getHours() + parseInt(val.substring(1)));
                    return dt;
                }
                if (c == '-') {
                    dt.setHours(today.getHours() - parseInt(val.substring(1)));
                    return dt;
                }
                return null; // use default Timebox parsing
            }
        ]]></value>
    </library-property>
</zk>

These handlers will capture strings in pattern “n”, “t”, “+1”, “-1”, etc., and convert them to desired dates and time. All the Datebox/Timebox in the application will be in effect, so we don’t need to specify explicitly on components:

<zk>
    <!-- Try input 't', '+1', '-1', etc. -->
    <datebox width="120px" />
    <!-- Try input 'n', '+1', '-1', etc. -->
    <timebox width="120px" />
</zk>

This feature provides a way to speed up date and time input for regular users of a web application, hoping to smoothen user workflow, especially when the application requires data from user frequently.

What is your opinion about this feature? We would like to hear your suggestions.

Feature Highlight Part 1
Feature Highlight Part 2


ZK Bind Syntax and Other Refinements from ZK 6 RC to RC2

$
0
0

In ZK 6 RC, we introduced various new features including ZK Bind, Generic enhancements, jQuery & CSS3 style server-side selectors, advanced templates etc. Thanks to the enthusiastic response and feedback from the community, as of the release of ZK 6 RC2, we are able to make some changes to suit and serve the needs of the community better. This blog will specifically talk about refinements of ZK Bind syntax and component selectors.

ZK Bind Syntax

In regards to syntax in ZUL, the following adjustments were made including the refinement of annotations for specific names while the rules of some expressions were simplified;

  • Syntax to assign a ViewModel has been changed
    • ZK 6 RC: viewModel=”@bind(vm=expr)”
      ZK 6 RC2: viewModel=”@id(‘vm’) @init(expr)”

  • Syntax to binding a command has been changed
    • ZK 6 RC: onEvent=”@bind(‘cmd’)
      ZK 6 RC2: onEvent=”@command(‘cmd’)

  • @bind() is now for non-command binding only, before|after ‘cmd’ no longer exist in bind()
    • i. For load-binding, use @load(expression, after=’cmd’, before=’cmd’), ‘before’ and ‘after’ are optional
      ii. For save-binding, use @save(expression, after=’cmd’, before=’cmd’), ‘before’ and ‘after’ are optional
      iii. @bind(expression) equals @load(expression) @save(expression) without ‘before’ and ‘after’ condition.

  • @form() has been removed, use form=”@id()…” instead
    • ZK 6 RC: self=”@form(id=’fx’, vm.selected, save=vm.selected before ‘cmd’)
      ZK 6 RC2: form=”@id(‘fx’) @load(vm.selected) @save(vm.selected, before=’cmd’)

In terms of Java, in order to provide more specific features and clearer package, the following changes has been made;

  • @NotifyChange and @DependsOn have been moved from org.zkoss.bind to org.zkoss.bind.annotation
  • For a command method, add the @Command annotation. With this annotation, binder can provide more features, such as @Param and @Default for acquiring argument of the context as the method parameter. We will talk about these in upcoming small talks
  • zbind.jar has been renamed to zkbind.jar, please remember to remove zbind.jar after upgrading to RC2
  • Maven artifactId(zbind) has been renamed to zkbind, please remember to change the pom.xml dependency if in use

Component Selectors

Regarding component selectors, for better naming and clearer package structure to avoid confusion, the following changes have been made;

  • GenericAnnotatedComposer is renamed to SelectorComposer
  • Annotations (@Wire, @WireXel, @WireZScript, @Listen) are moved from package org.zkoss.zk.ui.select to org.zkoss.zk.ui.select.annotation


Once again, the ZK Team appreciates the feedback and response from the community. As of today, ZK6 RC2 is now released, please try it out or check out the release note for new features and more.

ZK 6.5 & responsive design: Desktop and tablet applications from the same codebase

$
0
0

Introduction

The upcoming ZK 6.5 focuses on incorporating responsive design principles to afford developers the ability to create web applications which have an excellent user experience on desktops and tablet devices without writing separate applications.

Designing for tablets

The experience of tablets is different to that of desktops. Not only are their screens smaller, the way users interact with the applications is different. This means that developers need to change their thinking in order to provide a better user experience centered on application layout and methods of input.

ZK 6.5 steps in and does this for you!

Some of the benefits & changes in ZK 6.5
Using ZK’s core components with only little variation in CSS, it is possible to produce applications which support both desktop browsers and tablets. For a demonstration please check the video below:

In order to provide the best developer experience as well as the best user experience, ZK 6.5’s components behave differently depending upon whether they are displayed on a desktop browser or tablet. As seen in the video, some of these components behave differently on the tablet in the following ways:

  • Colorbox: Starting from its button, gradient block and circle bar to spaces between buttons are all magnified to suit the Tablet user experience better.
  • Datebox: Changes its input style totally; a calendar no longer appears, instead a spinning wheel styled datepicker is used for easier operation and experience.
  • Listbox: Hides the scrolling bar and capture swipe event such that end users are able to simply swipe down to scroll and browse.

We have tuned our components carefully to provide developers with the ability to write one application and have its style and behavior adapt to the desktop and tablet environments.

To try

To try, you can clone the source code or download war file, and run it on your environment. You can download the application using git and then use maven to build and run the application.

Enjoy and have fun!

Related reading:
ZK 6.5 & Tablet UI Design
ZK 6.5 Scrollview Component Preview

ZK 6.5 & Tablet UI Design

$
0
0

Introduction

Tablets are inherently different from desktops. Screen sizes and resolutions are smaller, finger-swiping replaces mouse-pointing and yes, sometimes, the tablet rotates. Web designers need to take these distinctions into consideration when designing web applications to make tablet surfing experience a bliss. The soon-to-be-released ZK 6.5 introduces new features that enable developers to design user interfaces that take advantage of tablet-specific user interaction methods such as swiping and changing device orientations.

ZK 6.5 enables you to know the tablet better!

New Events for ZK 6.5

Using ZK 6.5, it is now possible to detect swiping motion as well as current device orientation. Please check out the video below for a demonstration on how the information could help enhance user experience when viewed on tablets.

Below are some points you may want to take away from this demo video:

1. Conservation of screen space

Since the screen size of a tablet is limited compared to that of a desktop’s, to carefully organize the information displayed on a single web page becomes very important. One layout strategy employed on tablets is the split view. The left side of the screen displays a list of selectable items while the right side of the screen displays the details of the selected. As seen in this demo, the navigation menu on the left side is composed of a series of individual listboxes while the scrolling of each individual listbox is disabled. Not only can you reveal or hide the navigation menu by clicking on the menu-toggling button, you can also swipe left or right to close or open the navigation menu, respectively. To further conserve screen space, the less important sidebar on the right-hand side is hidden when the menu is visible.

2. Orientation-aware layouts

Web developers designing for tablets need to take note of the following. “Layouts that look good in landscape-view may look funny in portrait-view.”

For instance, if the landscape-view is divided into two columns, that same two columns may be too narrow when switched to portrait-view. Thus, the ability to detect device orientation and then to adjust the layout accordingly is a must-have. ZK 6.5 gives you that ability on the server-side.

This demo application also provides some examples on how to do the following.

1. Device-specific CSS

Sometimes, having different CSS rules for desktops and tablets is unavoidable.
It may be useful to generate CSS rule sets specially prepared for the client configuration detected at page loading time.

2. Combining MVVM with composite components

When the web page contains many widgets, placing them properly becomes an unwieldy task. Composite component is one way of decomposing complex layout into small, manageable parts. You can group recurring component patterns as composite components. Test the composites separately, and then supply their parameter values through data binding. Please see source code for more detail.

Give it a Try
This demo is available for download as source code or binary war file. You can fork and clone the demo source code through Git version control system, and then employ maven to build the application. Please deploy and experience it on your own tablet.

Enjoy and have fun!

Related reading:
ZK 6.5 & responsive design: Desktop and tablet applications from the same codebase
ZK 6.5 Scrollview Component Preview

Scrollview Component: An Easy Way to Create Scroll-able page on Tablet Devices

$
0
0

Introduction

Previously in ZK, applications exceeding the boundaries of browser resolution relies on desktop browsers to automatically generates scroll bars by using CSS style overflow attribute so users can view the entire page but this feature unfortunately is not available on tablet or mobile browsers.

In upcoming ZK 6.5 where responsive design and one codebase for multiple devices is the key, we therefore introduce users to a new scrollview component, which is a component designed to easily construct a scroll-able web page on both tablet and mobile browsers.

When end users access your application via a Tablet or any mobile devices, scrollview component detects and triggers this feature. Oppositely, if the application was accessed via a desktop browser, scrollview remains un-triggered while desktop browser will automatically generate scroll bars when needed just like before.

Demo
Let’s take a look at the demo video below first before digging into the implementation.

Implementation

  • Implementation of scrollview is easy. It can be easily used in a simple zul file as shown below:

    
        This is Window 1
    
    
        This is Window 2
    
    
  • scrollview also supports onScroll event: in the event you can easily detect if the user is scrolling outside boundaries, and you can choose to append more contents such as to load new updates in the case of Facebook.
<scrollview id="sv"
  onScroll="@command('append',
           target=self,
           pos=event.pos,
           outBound=event.outOfBound)">
  <!-- omitted -->
</scrollview>
public class ViewModel {
  //omitted...
  @command
  public void append(@BindingParam("target") Scrollview sv,
      @BindingParam("pos") int pos,
      @BindingParam("outBound") boolean outBound) {
    if (outBound && pos > 0) {
      //do something when scroll outside bottom boundaries
    } else if (outBound && pos < 0) {
      //do something when scroll outside top boundaries
    }
  }
}

For more detailed information on Scrollview component, please visit here

Related readings:
ZK 6.5 & responsive design: Desktop and tablet applications from the same codebase
ZK 6.5 & Tablet UI Design

Cardlayout: Swipe to change screen view

$
0
0

Introduction

In the upcoming ZK 6.5, we will introduce a new component called ‘Cardlayout’ enabling end-users to switch components like switching cards. On tablet, this navigation operation is supported by simply swiping through components.

Check out the demo below to see how it works exactly!

Live Demo

Implementation

Like HBox or Hlyout, developers can add any component to Cardlayout. The value of selectedIndex decides which component will be shown on the screen, when next() or previous() is called, the value of selectedIndex will change and hence the view on the screen.


	<cardlayout id="card" width="300px" height="300px" selectedIndex="1">
		<window title="Window Component" border="normal" 
		 width="200px">width: 200px</window>
		<window title="Window Component" border="normal" 
		 width="300px">width: 300px</window>
		<window title="Window Component" border="normal" 
		 width="400px">width: 400px</window>
	</cardlayout>
	<button onClick="card.previous()">previous</button>
	<button onClick="card.next()">next</button>


However, please note that Cardlayout‘s width is fixed and cannot be resized once it has been set initially.
For this reason, see line 4: the width of the component exceeds the width of the cardlayout by 100px, therefore, that 100px on the right of the component will be invisible on the screen.

Tablet experience: ZK 6.5 will handle the swipe action automatically, developer need not to worry anything about it! Yes, it’s this convenient!

Related readings:
ZK 6.5 & responsive design: Desktop and tablet applications from the same codebase
ZK 6.5 & Tablet UI Design
ZK 6.5 Scrollview Component

ZK 6.5′s Responsive Philosophy

$
0
0

Introduction

The Web and mobile development market are growing rapidly with more and more enterprises needing a strong presence on both platforms. This leads to a need for significant time and money investment creating applications which fulfil the needs of both platforms.

Most vendors provide separate component set for touch devices does not alleviate the problem of having to write two or more applications which support different devices. The fact that multiple applications or multiple pages for each view have to be written introduces a lot of cost and risk to the project which is not good for an uncertain enterprise mobile market.

With ZK 6.5 this pain is alleviated as we not only implemented responsive web design but have taken it further to enable developers to provide an optimal user experience across all devices without writing two applications or using multiple pages. This is a big plus for developers that want to create a tablet or smartphone application but do not want to spend time and money implementing two separate applications or sets of pages using different component sets.

The following diagram outlines the differences between other approaches and ours.

ZK's approach to supporting iPad, iPhone, Android tablets and phones

The diagram demonstrates how we take Responsive Design principles further.

Taking responsive web design further

With ZK 6.5 we have taken Responsive Design further to enable developers to provide an optimal user experience across all devices without writing two applications or using multiple pages.

This is a big plus for developers that want to create a tablet or smartphone application but do not want to spend time and money implementing two separate applications or sets of pages using different component sets. This is handled using our Responsive Components along with Responsive Design.

Responsive Design & Responsive Components

ZK 6.5 affords developers the ability to write one application and have it provide an optimal experience on any kind of device from the desktop to smartphones. This is device transparency. Device transparency is achieved using two techniques.

Responsive Design

ZK 6.5 fully supports responsive design and provides developers with the ability to use the latest cutting edge techniques including CSS3 to develop your applications so they will be optimized for different screen sizes and resolutions that one would find on desktop monitors, tablets and smartphones.

Responsive Design accounts for positioning of components on multiple devices. However, in addition to the layout working on multiple devices, users need components which transparently provide an optimal user experience for each device. Enter Responsive Components.

Responsive Components

Responsive components radically changing their behaviour to best suit the device that they are on, thus reinforcing device transparency.

Responsive component changes include seamless mouse event and touch event support depending on the device, default touch events for many components including but not limited to swipe gestures to change page in the grid, touch scrolling support, opening and closing layouts using touch and many more.

Summary

Device transparency is enforced using responsive design and responsive components which combine to provide ZK developers with the ability to write an application once and have it be optimized for different devices and platforms, such as desktop browsers, tablets and smartphones.

This is a massive advantage to developers who want to save time and money by having one application which through the help of ZK can automatically adapt to whichever platform or device that they use.

Device transparency builds on ZK’s history of producing cutting edge technology which lightens the load of developers all around the world. ZK continues to help developer’s by abstracting away their pain adding to our transparent Ajax & Java technology which enables you to write Ajax applications without knowing the communication details and control the browser using Java without the need for JavaScript.

Resources

Separate Codebase for Mobile, You’re Doing it Wrong

$
0
0

While working on the new version of ZK the question kept popping up, what do people want? If you could improve ZK, what would you do? One thing kept coming up time and time again, that was to further our support for mobile platforms such as tablets.

One of the interesting pieces of feedback which resonated with me personally and the rest of the team was writing an application and have it optimized to run on multiple platforms.

With current solutions on the market offering a separate component set to create mobile applications this is not possible as a separate component set would require either another page to be written purely for mobile devices or an entire new application thus giving the implementation team(s) more work.

The following sections outline why we believe that having a framework adapt to different platforms is a better approach.

Developers should be lazy, frameworks shouldn’t…

If you’re not a lazy developer, you’re doing it wrong…

Hlade’s law states “If you have a difficult task, give it to a lazy person; they will find an easier way to do it.” Thus lazy developers are the most successful, they are the ones who search for the most productive way to fulfill their goal.

So we want our developers lazy but not our frameworks. Frameworks are there to take the load of the developer so a framework which doesn’t want to the work is generally worthless.

In the UI realm having separate frameworks for different browser implementations, form factors and input methods is a relatively lazy approach from a framework. A framework should support the most popular browsers, form factors and input methods in one package. If a developer has to use multiple component implementations for each device that he wants to implement then it means he is using more time than he should be.

Too much risk, so we do the work for you…

Separate component sets are easy to implement…

For ZK at least separate component sets which provide support for smartphones and tablets are easier to implement. To understand this statement we need to look further into the history of implementing mobile support in ZK.

Originally we were producing a separate component set named “ZK Touch” which was going to be a component set for supporting touch devices. Things were looking promising and just one of our developers was able to implement core components in little over one week.

However, upon releasing ZK Touch we received an abundance of feedback from the community which suggested that it is too costly and time consuming to design the UI using a separate component set.

To eliminate this work and the risk associated with it, it was clear that we needed to create components which can automatically adapt and optimize to different devices (responsive components). However, to create said components was a much bigger undertaking than creating a separate component set for our development team. The implementation ended up taking around 6 man months, a far cry from just a week to implement the core components for ZK Touch.

This highlights an interesting point that the work and of supporting different devices still exists, it is just ZK does the work for you and thus eliminates developer risk. So in essence we assume the responsibility of supporting and making sure that your applications can function across many touch devices.

The Heavy Lifting…

A framework should do the heavy lifting for the developer.

A separate component set provides value in the form of a consistent API and UI representation across mobile devices but requires extra time to implement and extra time to style (if custom styling is required).

Having a framework which adapts to a whole manner of touch devices provides a massive amount of value to developers by enabling the writing of an application which will run across multiple platforms with little tweaking. This means that most of the effort can be put on writing the application itself rather than worrying about implementing multiple forms of an application.

Summary

Frameworks should do the work for the developer, by creating two separate component sets some of the work is passed to developers. This in our opinion is totally wrong and contravenes the principle of a framework such as ZK.


Control page visibility with HTML5 API in ZK

$
0
0

According to HTML5 page visibility API, it is useful to develop power efficient web applications. Here is an excellent demo written by Sam Dutton.

In the upcoming ZK 6.5.1, we implemented this API with onVisibilityChange event which is easy to use. Here is a very simple sample:


        if (!event.isHidden())
            lbl.setValue("Welcome back");


We can also use it with Server Push too, here I use chat room as an example. In the sample we assume two users are in the chat room, when first user leaves the chat room temporarily (first user’s browser page is hidden), second user’s browser page will show a notification which says that the first user left. When first user comes back (first user’s browser page is visible), second user’s browser page will show a notification that says first user is now back. Here are the code snippet:
1. The simple zul page.


    User: 
    Say: 


2. Listen onVisibilityChange event to root component and publish an event.

@Listen("onVisibilityChange = #win")
public void changeVisibility(Event event) {
    VisibilityChangeEvent evt = null;
    if (event instanceof VisibilityChangeEvent) {
        evt = (VisibilityChangeEvent) event;
        EventQueue que = 
          EventQueues.lookup("visibility", EventQueues.APPLICATION, true);
        String username = user.getValue();
        if ("".equals(username))
            username = "Unknow user";
        Map data = new HashMap();
        data.put("username", username);
        data.put("status", evt.isHidden() ? " Leaved" : " Come back");
        que.publish(new Event("onShowNotification", null, data));
    }
}

3. Subscribe the event and show the notification.

@Subscribe(value="visibility", scope=EventQueues.APPLICATION)
public void showNotification(Event event) {
    Map data = event.getData();
    String username = data.get("username");
    if (!username.equals(user.getValue())) {
        String message = data.get("username") + data.get("status");
        Clients.showNotification(message, "info", null, null, 1500);
    }
}

Normally, we can only get user status by checking session, with HTML5 Page Visibility API, we don’t need to save lot of information in session anymore.

Download whole sample code from github.

In ZK PE/EE, comet server push also supports this API to reduce server loading by default.

References:
HTML5 page visibility API
HTML5 page visibility API demo
ZK Developer Reference – Browser Page Visibility State

ZKPushState: A ZK Addon to Handle HTML5 History API in Pure Java

$
0
0

Introduction

HTML5 specification introduces new History API:

  • history object can use pushState() to push given data onto the session history and change the URL to a given one, if provided.
  • When history changes, browser will fire an onpopstate event to window.onpopstate.

History management with HTML5 History API in ZK introduces how developers can use this API in ZK with JavaScript code. In this article, I will go through how you can use this API using Java code. This is done by introducing a ZK add-on “ZKPushState”, a Java wrapper that allow developers to handle this feature in pure Java code which makes managing history more in a more ‘ZK’ way and simplifies the difficulty of encoding/decoding state.

How to Use?

The only thing you must do before start digging into the code is to download ZKPS.jar and put it in classpath so you can call PushState.push(Map, String, String) in Java and set onPopupState attribute on root element in ZUL.

Follow the example in the next section will make this more clear.

Example

Following Ashish’s example in History management with HTML5 History API in ZK which contains three textboxes and (filter)buttons. You could input some text in the textbox to search for the content you want and upon clicking the filter button, listbox will display filtered data based on the text entered in the textbox.

I will re-write his example using ZKPushState and MVVM, the ZUL code of the buttons would be as follows:

<button label="Filter" width="50px"
onClick='@command("filter", f1=filter1.value, f2=filter2.value, f3=filter3.value)' />

In the View Model, the command method writes:

@Command
@NotifyChange("*")
public void filter(@BindingParam("f1") String f1, @BindingParam("f2") String f2, @BindingParam("f3") String f3){
  doFilter(f1, f2, f3);
  Map<String, String> map = new HashMap<String, String>();
  map.put("f1", f1);
  map.put("f2", f2);
  map.put("f3", f3);
  PushState.push(map, "Search results", "?q="+f1+f2+f3);
}

The function of doFilter is to rebuild the model of listbox. At the end of filter(), I invoke PushState.push() which will execute history.pushState() on client side automatically. At this point in time, the URL will change and end users can go back to its previous state by clicking back on the browser and going back to the previous page.

This is what happens: after a few searches, browser will keep some states to bind with the give URL. When end users click the browser’s “back” button, ZKPushState will fire a PopupStateEvent, therefore, I need to add onPopupState on the ZUL root element like the following:

<window onPopupState='@command("popupState", event=event)'>

In the view model, the command method writes:

@Command
@NotifyChange("*")
public void popupState(@BindingParam("event") PopupStateEvent event){
  Map<String, ?> state = event.getState();
  doFilter(
    state.get("f1").toString(),
    state.get("f2").toString(),
    state.get("f3").toString()
  );
}

We can retrieve the state by event.getState() which will return a Map<String, ?> instance. To do this, we call doFilter with arguments returned by PopupStateEvent, listbox will thus show the same data as before (before the user exited this page previously).

You can download the complete source code for this example and ZKPushState from its github repository here.
Any feedback is welcome :)

Manipulate components inside a macro component

$
0
0

Introduction
Macro component is a useful technique to modularize complex ZUL pages. In most use cases, macro component consists of several fixed components. However, you may want to append more components inside a macro component based on some action. This blog will show how you can add additional components to a wired component inside a macro component. Here we will use a breadcrumb macro component as an example and dynamically create components inside it.

Sample Scenario
In this sample, there is a side bar menu with a tree component, the breadcrumb component will change the path according to the treeitem clicked.

Breadcrumb macro component
First, create a breadcrumb.zul like the following to define a macro component.

<zk>
    <hlayout id="m_hlayout" hflex="1" height="20px"
        sclass="breadcrumb" spacing="10px">
    </hlayout>
</zk>

Main zul page
Then, use the macro component in the main zul page.

<?component name="breadcrumb" macroURI="/WEB-INF/macro/breadcrumb.zul" class="demo.macro.BreadCrumb"?>
<zk xmlns:n="native">
    <div vflex="1">
        <borderlayout hflex="1" vflex="1" apply="org.zkoss.bind.BindComposer" viewModel="@id('vm') @init('demo.macro.MacroSampleVM')">
            <north border="none">
                <div>
                    <label value="Blog Title" />
                </div>
            </north>
            <east width="280px" border="none">
                <div>
                    <tree model="@bind(vm.menuModel)">
                        <template name="model" var="node">
                            <treeitem label="@load(node.data.label)" onClick="@command('loadArticle', node=node)" />
                        </template>
                    </tree>
                </div>
            </east>
            <center autoscroll="true" border="none">
                <vlayout>
                    <breadcrumb hflex="1" path="@bind(vm.path)" />
                    <vlayout>
                        article list
                    </vlayout>
                </vlayout>
            </center>
        </borderlayout>
    </div>
</zk>

View Model
In View Model, register a click event to command loadArticle and notify the path change to the macro component.

public class MacroSampleVM {
    private DefaultTreeModel<ArticleLabel> menuModel;
    private TreeNode<ArticleLabel> path;
    public MacroSampleVM() {
        // generate tree
        TreeNode<ArticleLabel> root = new DefaultTreeNode<ArticleLabel>(null, generateYears());
        menuModel = new DefaultTreeModel<ArticleLabel>(root);
    }
    @Command("loadArticle")
    @NotifyChange("path")
    public void loadArticle(@BindingParam("node") DefaultTreeNode<ArticleLabel> node) {
        path = node;
    }
}

Breadcrumb macro component class
Finally, define setPath API in BreadCrumb.java to add a new component inside the macro component.

public class BreadCrumb extends HtmlMacroComponent {
    @Wire
    private Hlayout m_hlayout;
    //other member fields
    public BreadCrumb() {
        compose();
    }
    public TreeNode<ArticleLabel> getPath() {
        return _node;
    }
    public void setPath(TreeNode<ArticleLabel> node) {
        _node = node;
        _paths.clear();
        m_hlayout.getChildren().clear();
        generatePaths(node);
        //create components here and set parent to wired Hlayout
        A[] links = new A[_paths.size() - 1];
        for (int i = links.length - 1; i >= 0; i--) {
            TreeNode<ArticleLabel> n = _paths.pollLast();
            String label = n.getData().getLabel();
            links[i] = new A(label);
            links[i].setParent(m_hlayout);
        }
        _paths.clear();
    }
    private LinkedList<TreeNode<ArticleLabel>> generatePaths(TreeNode<ArticleLabel> node) {
        //skip
    }
}

Communicate internal components with View Model
As we can see from the sample above, we can create components inside a macro component by using a click event defined in View Model. Here we will show how to register an event on a newly added component and pass it onto View Model.

First, add a forward event to the newly added component, the target component is the macro component itself.

public class BreadCrumb extends HtmlMacroComponent {
    //omitted
    public void setPath(TreeNode<ArticleLabel> node) {
        //...
        A[] links = new A[_paths.size() - 1];
        for (int i = links.length - 1; i >= 0; i--) {
            TreeNode<ArticleLabel> n = _paths.pollLast();
            String label = n.getData().getLabel();
            links[i] = new A(label);
            links[i].setParent(m_hlayout);
            links[i].addForward(Events.ON_CLICK, this, "onPathClick", n);
        }
        //...
    }
}

Then, we can listen to onPathClick event on zul and bind with MVVM.

<!-- omitted -->
<vlayout>
    <breadcrumb hflex="1" path="@bind(vm.path)" 
        onPathClick="@command('loadArticle', node=event.data)" />
    <vlayout>
        article list
    </vlayout>
</vlayout>
<!-- omitted -->

Demo

You can download the complete source code for this example from git.

More information about macro component

ZK 7: New Theme System with Bootstrap & CSS 3

$
0
0

Introduction

ZK 7 is an upcoming big release focusing on HTML5 & CSS3. Simplified by reducing the DOM structure and JavaScript code, ZK 7′s theme will be more easily customizable than previous versions and its JavaScript code running more efficiently than ever. ZK 7 will also support CSS3′s icon font feature bringing the great benefits of being able to scale, change colour and include shadows to your icons easily and conveniently . In the following demo, we will show you how you can customize a theme to look like ones coming from Wrapbootstrap (a marketplace for twitter bootstrap).


Feature Highlight

  • Bootstrap Theme Support – In ZK 7, you can apply twitter bootstrap themes to ZK seamlessly, such as Button, Group Button, and Layout System, without breaking the components’ functionality and look & feel.
  • LESS Support – The theme of ZK 7 is based on LESS, a dynamic stylesheet language, to generate the css.dsp file for ZK 7 to use.
  • Icon Font Support – With this feature, you can use the setIconSclass method to specify the icon font for a component, which is extended from LabelImageElement class, or, use built-in icons from ZK 7, which is integrated with Font Awesome
  • CSS3 Support – Since ZK 7′s theme is totally revised by CSS3 features including gradient, box-shadow, border-radius etc, users can now customize their themes with CSS3 pretty much instantaneously.

Demo

In this demo, we customize the page with Pure ZK and CSS3. There are three different coloured themes and they are able to be switched dynamically without having to reload the whole page.

High-quality video can be found here
 
Note:This demo design is referenced from Unicorn Admin Template – WB0F35928

Behind the Scenes

  • Design phase – Normally, the design comes from a web designer or artist; In this case we choose the unicorn-admin-template from Wrapbootstrap.
  • Analyze phase – In this phase, we need to choose the right ZK components accordingly to layout the whole page as illustrated below:
    Example1
  • Implement phase – After analyzing the page, we can now add some ZK components with corresponding CSS classes to layout the structure of the page. For example,
    <div sclass="header">
    	// The Header Content
    </div>
    <div sclass="search">
    	// The Search Content
    </div>
    <div sclass="user-nav">
    	// The User-Navigation Content
    </div>
    <navbar orient="vertical" sclass="sidebar">
    	// The Sidebar Content
    </navbar>
    
    <div sclass="style-switcher">
    	// The Style-Switcher Content
    </div>
    
    <div sclass="content">
    	<div sclass="content-header">
    		// The Dashboard Content
    	</div>
    	<div sclass="breadcrumb">
    		// The Breadcrumb Content
    	</div>
    	<include src="zk/content.zul" />
    </div>
  • Customize phase

    Below is what a base layout with a normal ZK theme would look like:

    Example2

    After applying the bootstrap CSS file and the customized CSS file which is referred from Wrapbootstrap, we can get the following result.

    Example3

    Three different coloured themes illustrated below:

    zk7-demo

    Fragment example of a customized menupopup.

    Menupopup-example
    ZUL File

    <menu iconSclass="icon icon-white icon-envelope" label="Messages">
    	<menupopup sclass="navpp">
    		<menuitem label="new message" />
    		<menuitem label="inbox" />
    		<menuitem label="outbox" />
    		<menuitem label="trash" />
    	</menupopup>
    </menu>
    

    As you can see from the above, the iconSclass attribute is a new feature of ZK 7 to support icon CSS, rather than using the src attribute that supports image URLs only.

    LESS File

    .navpp.z-menupopup {
    	// change the background style
    	background: #FFF;
    	.borderRadius('5px');
    	.boxShadow('0 5px 10px rgba(0,0,0,0.2)');
    	padding: 0;
    	
    	.z-menupopup-content {
    		padding: 6px 0;
    	}
    	
    	// disable the unused style
    	.z-menupopup-separator,
    	.z-menu-image,
    	.z-menuitem-image {
    		display: none;
    	}
    
    	// change the effect of menu and menuitem
    	.z-menu-content,
    	.z-menuitem-content {
    		padding: 3px 20px;
    		line-height: 14px;
    		* {
    			text-shadow: none;
    		}
    		&:hover,
    		&:active {
    			color: #FFF;
    			border-color: transparent;
    			.borderRadius('0');
    			.boxShadow('none');
    		}
    	}
    
    	// add a top arrow at the top of the popup
    	&:before {
    		position: absolute;
    		top: -7px;
    		left: 9px;
    		display: inline-block;
    		border-right: 7px solid transparent;
    		border-bottom: 7px solid #FFF;
    		border-left: 7px solid transparent;
    		border-bottom-color: #FFF;
    		content: '';
    	}
    }
    

    If we want to change the popup to red like the image below, we simply add the following CSS.

    Menupopup-example2

    .navpp.z-menupopup {
    	.verGradient (#830000 , #6f2d2d);
    	
    	.z-menu-content,
    	.z-menuitem-content {
    		color: #FFF;
    	}
    	&:before {
    		border-bottom-color: #6f2d2d;
    	}
    }
    

    Note: .verGradient() is a built-in function for LESS in ZK 7 to generate vertical gradient backgrounds in modern browsers.

ZK 7 Preview is now available for download here.


Example Source
The source code can be found in Github and the layout design is owned by diablo9983.

References

ZK 7 Navigation Component: Your Website’s Digital Roadmap

$
0
0

Introduction

Navigation is a key component in a website,  a good navigation design can greatly improve a user’s experience. It not only presents the website’s information briefly, but also helps users locate and link to other pages in the website. Previously in ZK, we provide components like menu, tab, listbox which can be used for navigation purposes, but they require some sort of effort to add a few customizations to meet requirements. In the upcoming ZK 7, however, we are pleased to introduce a new set of navigation components. Developers are now able to design excellent navigation menus and sitemaps more easily and rapidly by using the new navigation components.

Navigation components of ZK 7 consists of the following features:

  • Highlight current tab - highlights the tab which  the user is on
  • Sub-navigation - in order to reduce the website’s complexity, a child navigation bar can be used to categorize and simplify directories. Users can expand and collapse a sub-navigation to show or hide the inside links.
  • Display the number of item that is inside a sub-navigation - optional to choose whether or not to show the number of the links/items inside the sub-navigation.
  • Support both vertical and horizontal mode – navigation bar can be placed in a vertical or horizontal orientation.
  • Add icons and images to the tabs easily - developers can integrate icons and images to the navigation link easily.

Live Demo

In the demo we will use a todo list as an example to show how the navigation component works.

Get Adobe Flash player

Please note that images used in the demo are  borrowed from http://www.morguefile.com (License: morgueFile license)

Implementation

The implementation of these navigation components are easy requiring only simple ZUL code snippets as shown below:

<navbar id="sidebar" orient="vertical"> 
  <navitem label="Inbox" iconSclass="z-icon-inbox"/>
  <navitem label="Create Task" iconSclass="z-icon-pencil"/>
  <nav label="Next Actions" iconSclass="z-icon-th-list" detailed="true">
    <navitem label="Rescue the Baby" iconSclass="z-icon-star"/>
    <navitem label="Play Darts" />
... ...

navbar creates a navigation bar which contains nav or navitemnav is a sub-navigation bar while navitem represents a link. The entire structure is very similar to the html ul and li tags. All Developers have to do is to arrange the navigation structure and links that it contains, and it would turn out as a well-designed navigation bar.

ZK 7 Preview is now available for download here.
Please note that this component is EE only, make sure you download the EE evaluation copy to try it out.

Resource

  • Download demo here.

ZK 7: ZK Components x Bootstrap 3

$
0
0

Introduction

In our previous blog post, we demonstrated how to use ZK 7′s new theme system with Bootstrap & CSS3. In this blog, we will guide you with more details on how to make ZK components and Bootstrap 3 (& Bootstrap 2) work seamlessly. Our target in this tutorial is to try and implement the components demonstrated in Bootstrap’s website (Buttons, Navbar, and Panels).

Prerequisites

  • ZK 7.0.0-Preview version or later
  • Bootstrap 3 knowledge, read here
  • ZK Component development knowledge, read here

Step One
Download Bootstrap 3 here and copy its css, fonts, and js folder to your eclipse project as follows:

08-28-2013-01

Step Two

Create an index.zul file as follows:

<?page title="ZK Theme with Bootstrap 3"?>
<?link rel="stylesheet" type="text/css"
    href="/bootstrap/v3/bootstrap/css/bootstrap.css" ?>
<zk xmlns:w="client" xmlns:n="native">
    <n:h3 id="btn-groups">Button groups</n:h3>
    <include src="zk/button-groups.zul"/>

    <n:h3 id="navbar">Navbar</n:h3>
    <include src="zk/navbar.zul"/>

    <n:h3 id="Panels">Panels</n:h3>
    <include src="zk/panel.zul"/>
</zk>

As you can see, we only include the bootstrap.css in our demo and include three zul files, button-groups.zul, navbar.zul, and panel.zul (We will explain them later).

Step Three
Create a button-groups.zul file under the zk folder like Step 1’s snapshot.

<script src="zk/js/button-bs.js" />
 
<div class="btn-group">
    <button>Left</button>
    <button>Middle</button>
    <button>Right</button>
</div>
// … omitted

As you can see, we create a button-bs.js, which is used to generate the CSS result according to the bootstrap documentation like the following:

08-28-2013-02

<div class="btn-group">
  <button type="button" class="btn btn-default">Left</button>
  <button type="button" class="btn btn-default">Middle</button>
  <button type="button" class="btn btn-default">Right</button>
</div>

Here is the content of button-bs.js

zk.afterLoad('zul.wgt', function () {
	var _button = {};

zk.override(zul.wgt.Button.prototype, _button, {
	_sclass: 'btn-default',
	getZclass: function () {
		return 'btn';
	}
});

});

As you can see, the zk.afterLoad() function is used to register a callback function when the ‘zul.wgt’ package loads. We use zk.override() function to override the default ZK Button’s implementation. In this case we override getZclass() to output the ‘btn’ for bootstrap and specify the default sclass to output ‘btn-default’ to use the default button theme from bootstrap.
And then we could use the sclass to change more themes that bootstrap provided. Like primary, success, info, warning and danger.

For example,

08-28-2013-03

<button>Default</button>
<button sclass="btn-primary">Primary</button>
<button sclass="btn-success">Success</button>
<button sclass="btn-info">Info</button>
<button sclass="btn-warning">Warning</button>
<button sclass="btn-danger">Danger</button>

Step Four

After completing all the above, we can run this project with eclipse to see the result by visiting http://localhost:8080/ui-examples/bootstrap/v3/index.zul.

Note: Panel and navbar have the same concept as button, to learn more details, please take a look from the download section.

Download
All the example above can be found from Github.

ZK7: Create a new a theme project

$
0
0

Introduction

ZK 7 is an upcoming big release focusing on HTML5 and CSS3. Themes are now based on LESS, which means that code is now much cleaner and more concise. The greatest value of this change to users is that it is now also very easy to create a new theme. This blog will guide you step by step on how to create your own theme for ZK 7.

Prerequisites
Here we assume you already have a ZK web project created by maven. In this demo we will use the same project in navigation component blog.

Step 1: create zk theme maven project from zk-maven-archetype in Eclipse

  • Refer to this document for using zk-maven-archetype.
  • Follow Eclipse wizard to create a new zk theme maven project from zk-maven-archetype.
    • Select zk-archetype-theme then click Next
    • zk7-theme-01

    • Type Artificial Id, theme-name and theme-listener-class values then click Finish
    • zk7-theme-02

    • Result
    • zk7-theme-03

Step 2: Customize theme and Check customization

  • Customize black theme
  • In the previous step, we created a black theme project and we can see how _zkvariables.less file located under web/black/zul folder. This file contains all the LESS variables for ZK’s default theme. Now, to customize a black theme, simply modify the color code value for these LESS variables.

    For example, to change navigation component colours, search “navbar” in _zkvariables.less file and find all the LESS variables that are used for the component. We then simply modify them to adapt the black theme style like the following:

  @navColor:                     #FFFFFF;
  @navBorderColor:               #0C0C0C;
  @navBackgroundColor:           #372F2B;
  @navHoverBackgroundColor:      #0E0E0E;
  @navSelectedColor:             #333333;
  @navSelectedBackgroundColor:   #FFFFFF;
  
  • Check the customization
  • 1. Open pom.xml in black theme project, and uncomment PE/EE related comments if you are building theme for PE/EE edition.
    2. Run maven install for black project, it will compile LESS files and create the theme jar file.
    3. In your existing ZK project, add black theme dependency in pom.xml.


          org.zkoss.theme
          black
          0.8.0-SNAPSHOT


    And add preferred theme in zk.xml

      
          org.zkoss.theme.preferred
          black


    4. Start up ZK project to check the customization.

    Original Style
    zk7-theme-05
    Black Style
    zk7-theme-04

    5. If you change LESS variables’ values again, run mvn test again to compile LESS based on latest modification. Then re-start ZK project to check the customization.
    6. After you have done the customization, execute mvn install to build the jar file.

    Build by Ant instead of Maven

    Previously we have showed you how to use Maven to build theme, here is the step if you would like to build by Ant.

    • 1. Follow the online document to install Apache Ant.
    • 2. Download the following necessary jars from zk repository (right click -> save as) and put in project/lib folder.
      • commons-logging.jar
      • js.jar
      • lesscss-engine.jar
      • yuicompressor.jar
      • zkjszips.jar
      • zkless.jar
      • zul.jar (extract zk-bin-7.0.0-Preview.zip file from sourceforge)
    • 3. Write ant script build.xml file like the following sample under project folder, and change input folder and output folder as needed.
    • 


    • 4. Execute ant command in command line tool.

    ZK 7 Introduces Atlantic Theme: A New Flat Design

    $
    0
    0

    Introduction

    Flat Design is getting more and more popular lately and has become the new trend in the world of user interface design (you can take a look at this article explaining the philosophy of flat design if you’re interested). As of this reason, we have created a whole new theme based on flat design named Atlantic in our latest ZK 7. The basic concept of Atlantic is to remove gradients, rounded corners and shadows that are used in a lot of the breeze theme. This flat design also gives users an advantage of easier customization without having to take care of those skeuomorphic effects.

    Atlantic Vs. Breeze

    Atlantic & breeze design in various components.

    • Window Component
    • atlantic-window breeze-window
    • Button Component
    • atlantic-button breeze-button
    • Listbox Component
    • atlantic-listbox breeze-listbox

    Download & Usage

    To use Atlantic, download the theme from github (right click -> save link as), place the theme jar under WEB-INF/lib and modify zk.xml as follows

    
        org.zkoss.theme.preferred
        atlantic


    Please note that this theme is only available for ZK 7.

    Introducing the New ZK-Less Compiling Engine in Node.js Environment

    $
    0
    0

    Introduction

    We introduced a new ZK-Less Engine built on Node.js in the release of ZK 7.0.3.

    The new Engine will have a much faster compiling speed. You will need to install Node.js

    in your environment in order to use it.  If you have not tried ZK-Less features yet, please

    take a quick look at How ZK Works With LESS. If you are not familiar with Less in general,

    please refer to the official site.
    Installation Requirements

    ZK version: 7.0+

    Node.js version: 0.10.30 +

    Node.js is required for the new Less Engine. For details on how to install Node, please refer

    to the official site of Node.js.
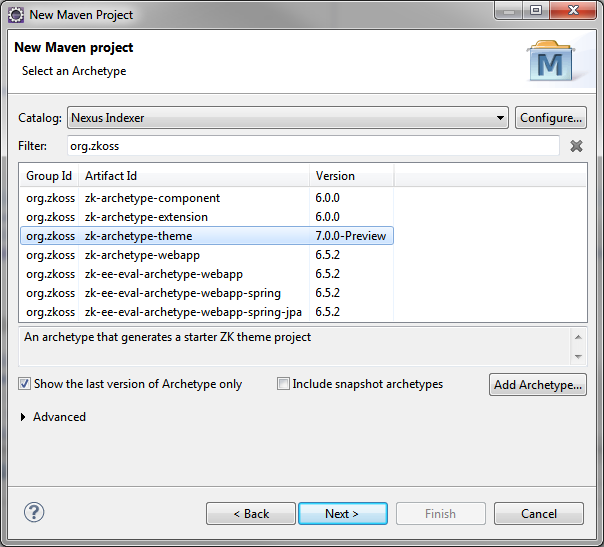
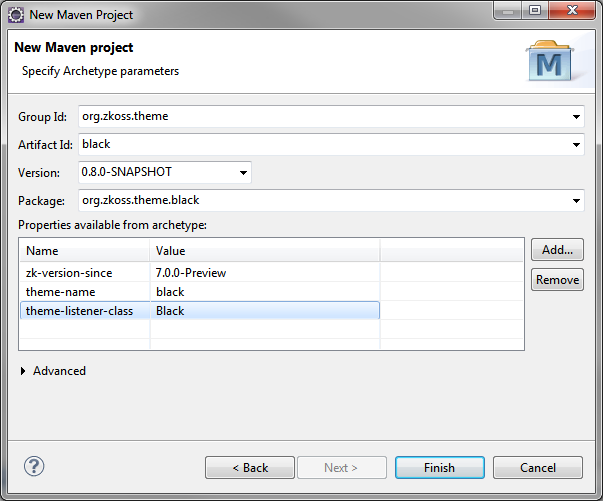
    How to use

    Depending on your developing  preferences, we provide two different approaches to use our less

    engine.

    The Ant approach:

    First, please download the following jars from zk’s repository and copy them into your

    ${Project_Root}/lib directory.

    Required Jars:

    • yuicompressor.jar
    • zkjszips.jar
    • commons-io.jar
    • CssCompressor.jar
    • zul.jar (extract zk-bin-7.0.X.zip file from Download ZK)

    Next,  install our ZK-Less Engine’s node package by npm (Node Package Manager) in a project folder like the following:

    npm install zkless-engine

    Write an Ant script build.xml like the following:

    <?xml version="1.0"?>
    <project name="less.compile" default="lessc" basedir=".">
        <target name="lessc">
            <exec executable="node">
                <!-- location of the engine's core file --> 
                <arg value="${basedir}/node_modules/zkless-engine/lib/CpLess.js"/>
                <!-- input folder that contains less files-->
                <arg value="${basedir}/src/main/webapp"/>
                <!-- output folder -->
                <arg value="${basedir}/src/main/webapp"/>
                <!-- path of zul.jar -->
                <arg value="${basedir}/lib/zul.jar"/>
            </exec>
            <!-- compress the result using zk's Css Compressor -->
            <java classname="CompressCss" fork="true">
                <!-- input folder (same as above) -->
                <arg value="${basedir}/src/main/webapp"/>
                <!-- output folder (same as above) -->
                <arg value="${basedir}/src/main/webapp"/>
                <classpath>
                    <!-- required jars -->
                    <pathelement location="${basedir}/lib/zkjszips.jar"/>
                    <pathelement location="${basedir}/lib/yuicompressor.jar"/>
                    <pathelement location="${basedir}/lib/commons-io.jar"/>
                    <pathelement location="${basedir}/lib/CssCompressor.jar"/>
                </classpath>
            </java>
        </target>
    </project>

    Execute the Ant command to compile your Less files:

    ant lessc

    The Maven approach:

    We have built a maven plugin for our Less Engine. To use this plugin, install the native Less Engine first:

    npm install -g less

    Note that the less package has to be installed as a global package (with the -g ).

    Next, include a plugin declaration in your pom file:

    <!-- Add Plugin Repository -->
    <pluginRepositories>
        <pluginRepository>
            <id>zkmaven</id>
            <name>ZK Maven Plugin Repository</name>
            <url>http://mavensync.zkoss.org/maven2/</url>
        </pluginRepository>
    </pluginRepositories>
    <dependencies>
        <!-- only needed if using _zkmixins.less provided by ZK -->
        <dependency>
            <groupId>org.zkoss.zk</groupId>
            <artifactId>zul</artifactId>
            <version>7.0.3</version>
        </dependency>
    </dependencies>
    <build>
        <plugins>
            <!-- Add zkless-engine-maven-plugin -->
            <plugin>
                <groupId>org.zkoss.maven</groupId>
                <artifactId>zkless-engine-maven-plugin</artifactId>
                <version>0.9.4</version>
                <executions>
                    <execution>
                        <id>compile-less</id>
                        <goals>
                            <goal>lessc</goal>
                        </goals>
                        <configuration>
                            <!-- LESS source folder -->
                            <sourceDirectory>
                                ${project.basedir}/src/main/resources
                            </sourceDirectory>
                            <!-- *.CSS.DSP output folder -->
                            <outputDirectory>
                                ${project.basedir}/src/main/resources
                            </outputDirectory>
                        </configuration>
                    </execution>
                </executions>
            </plugin>
        </plugins>
    </build>

    Last, execute mvn install command to compile your Less files.


    Compile Less files during your development

    We also have a Servlet called ZKLessServlet for development use.

    To use it, first, add maven dependency in your pom file.

    <repositories>
        <repository>
            <id>ZK CE</id>
            <name>ZK CE Repository</name>
            <url>http://mavensync.zkoss.org/maven2</url>
        </repository>
        <!-- omitted other repository -->
    </repositories>
    <dependencies>
        <dependency>
            <groupId>org.zkoss.maven</groupId>
            <artifactId>zkless-servlet</artifactId>
            <version>0.9.4.2</version>
        </dependency>
        <!-- omitted other dependency -->
    </dependencies>

    Second, include servlet settings and mappings in web.xml like the following:

    <web-app>
        <!-- omitted other servlets -->
        <servlet>
            <servlet-name>zkLess</servlet-name>
            <servlet-class>org.zkoss.less.ZKLessServlet</servlet-class>
            <init-param>
                <param-name>org.zkoss.less.LessResource</param-name>
                <!-- specify to the folder that contains *.less -->
                <param-value>/less</param-value>
            </init-param>
            <init-param>
                <param-name>org.zkoss.less.OutputFormat</param-name>
                <!-- specify output file suffix, default .css.dsp -->
                <param-value>.css.dsp</param-value>
            </init-param>
            <init-param>
                <param-name>org.zkoss.less.CompressOutput</param-name>
                <!-- compress output, default true -->
                <param-value>true</param-value>
            </init-param>
            <load-on-startup>1</load-on-startup>
        </servlet>
        <servlet-mapping>
            <servlet-name>zkLess</servlet-name>
            <!-- specify to folder that contains *.less -->
            <url-pattern>/less/*</url-pattern>
        </servlet-mapping>
    </web-app>

    Third, put your Less files under webapp/less folder

    Hope you will like our new Less Engine,  A more detailed instruction on how to use the new Engine

    is provided in Compile LESS.


    Online ThemeRoller Enhanced

    $
    0
    0

    Previously, we have introduced the online theme roller for ZK 7.0 which allows users to customize and design their own personal or corporate themes. We have received a lot of feedback from our users and have now enhanced the tool further based on these feedback; providing more easy-to-use features and templates so that you can design themes even easier and quicker!

    New Improvements

    1. Export/Import Themes
    2. Sometimes theme design may involve back and forth discussions with your team or with your customer. This new feature allows you to save your current design and import it later for further customization. For example, let’s say you have designed two themes, one is based on a yellow color set and the other one is based on a green color set. Now, you can export these color sets from the theme roller and import them later to further fine-tune based on the color set your customer prefers.

      To view the whole video, right click on the video and check “Show All” option.

      Get Adobe Flash player

    3. Gallery
    4. You may want to create something original but more often you may wish to design a new theme based on an open source theme that you like, e.g. Bootswatch. Theme roller now load default ZK and Bootswatch like themes so that you can use them to customize your own themes based on these templates. This makes your work much easier and faster!

      ThemeRoller-Gallery

      Note. Bootswatch is a 3rd party project, for licensing information please refer to: Bootswatch License.

    5. Auto-save
    6. Designing a new theme is a time consuming job, it would be such a pain and a lot of resentment if your browser accidentally crashes along with all the designs you have made in the theme roller. For this, we have introduced this new feature so that the theme-roller now automatically remembers your last design to prevent you from such kind of tragedy and to keep you happy.

      To view the whole video, right click on the video and check “Show All” option.

      Get Adobe Flash player

      Note that if you disable browser cookie, this function will be disabled too.

    7. Performance Boost
    8. In the previous version, “Preview Changes” takes around 5-10 seconds, it will now only take 1-3 seconds. By using a new compiling engine, the speed of theme compiling and download also increases around 70~90%.

    Introducing new ZK Addon – ZK Timeline

    $
    0
    0

    Introduction

    Timeline is used to visualize events in the times which they occur. These events can be inserted with their own start date and end date. Same as any ZK component, you can easily customize and style the contents and the appearance of these events.

    A timeline contains two axes – main axis and sub axis(sub axis can be hidden), you can scroll the timeline by dragging and using the mouse scroll-wheel.

    These two axes are synchronized in scrolling. You can easily zoom-in in the main axis by dragging the bar in the sub axis, and zoom-in in the sub axis by clicking the zoom in/zoom out icon on the left side of the sub axis.

    Timeline Demo (Solar system explorations)


    Get Adobe Flash player

    Initialize Timeline

    ZK version: 6.0.2+
    IE Version: 9+

    Settings required:
    1. Set the layout “time”

    There are 6 parameters (3 pairs) to set the layout time:

    parameters description
    minTimeBound & maxTimeBound the minimum/maximun time bound of timeline.
    viewportLeftTime & viewportRightTime the main axis time on the left/right side.
    (optional)
    subViewportLeftTime & subViewportRightTime
    the sub axis time on the left/right side.

    SolarSystemExplorationTimelineComposer.java

    SimpleDateFormat _sdf = new SimpleDateFormat("dd/MM/yyyy");
    timeline.setMinTimeBound(_sdf.parse("1/1/1950").getTime());
    timeline.setMaxTimeBound(_sdf.parse("1/1/2025").getTime());
    timeline.setViewportLeftTime(_sdf.parse("1/10/1995").getTime());
    timeline.setViewportRightTime(_sdf.parse("1/7/1998").getTime());
    //timeline.setSubViewportLeftTime(_sdf.parse("1/1/1995").getTime());
    //timeline.setSubViewportRightTime(_sdf.parse("1/12/1999").getTime());

    Notice that viewport time range should not be out of the range of the min/max time bound.

    2. Prepare timeline data & model
    Event data is saved in the timeline’s model, you can use the default timeline model (or implement one).

    SolarSystemExplorationTimelineComposer.java

    String[][] evtData = {
    {"Soviet Union","Sputnik 1 ","4/10/1957","First Earth orbiter "},
    ...,
    {"Soviet Union","Sputnik 2 ","3/11/1957","Earth orbiter, first animal..."}};
    
    SimpleTimelineModel model = new SimpleTimelineModel();
    model.add(new SolarSystemExplorationEvent(_sdf.parse(evtData[0][2]),...);
    ...
    timeline.setModel(model);

    3. Prepare timeline renderer
    Timeline renderer render event data to the appearance of event in timeline (by method – getContent()).

    public class SolarSystemExplorationTimelineRenderer 
      implements TimelineRenderer<SolarSystemExplorationEvent>{
      public long getStartDate(SolarSystemExplorationEvent e) {
        Long result = null;
        if (e.getStartDate() != null) {
          result = e.getStartDate().getTime();
        }
        return result;
      }
    
      public long getEndDate(SolarSystemExplorationEvent e) {
        Long result = null;
        if (e.getStartDate() != null) {
          result = e.getStartDate().getTime();
        }
        return result;
      }
    
      public String getContent(SolarSystemExplorationEvent e) {
        StringBuilder content = new StringBuilder();
        ...
        String topic = e.getTopic();
        if (topic.length() > 0) {
          content.append("<div>" + topic + "</div>");
        }
        return content.toString();
      }
    }

    SolarSystemExplorationTimelineComposer.java

    TimelineRenderer<?> render = new SolarSystemExplorationTimelineRenderer();
    timeline.setRenderer(render);

    4. listen timeline events
    There are 3 main timeline events provided:

    • onEventSelect – when user clicks on any event
    • onEventTooltip – when mouse hovers on top of any event
    • onViewportChange – when timeline axis scrolls, returns the information of the viewport time (left/right)

    The sample code is now available for download here.

    Live Demo

    Get a hands on experience here!

    Example Source

    The source code can be found in Github and it is distributed under Apache License 2.0. Everyone can use this DEMO source code for free.

    References

    wiki -Timeline_of_Solar_System_exploration

    ZK8: New Form Binding Approach

    $
    0
    0

    2015/3/16 updated:

    Now the proxy object in form binding will auto-detect the changes of proxy object and form status. In this sample, the following code segment can be omitted : BindUtils.postNotifyChange(…);
    Introduction

    We are glad to disclose the firsthand information on one of the most to die for features in ZK 8 – New Form Binding Approach. It can deeply support these types – Collections, Map, and POJO in a form concept, as a proxy object for developers to manipulate them when users edit data in the form field. Once the form is submitted, all the edited data will be synchronized back to the original data object.

    The following class diagram shows the difference of Form Binding implementation between ZK 7 series and ZK 8.0.

    Form Class Diagram

    As shown in the diagram above, all user bean instances in the new Form Binding are proxy objects which can be used in the same way as the origin object without having to understand the underlying details of the Form Binding mechanism.

    Books Management Demo

    Here’s an example to demonstrate the form object (Book) with a collection property (Categories) in which users can edit the field data that belongs to Book or Categories in their own scope for caching.

    Get Adobe Flash player

    In this demo, only the following 3 classes – BooksViewModel, Book, and Category are used:

    ZK8- New Form Binding Approach

    With the new Form Binding, following the Java Proxy contract, the two classes – Book and Category needs to provide an empty constructor for the proxy mechanism to use. As shown in the diagram, in the Category class, we overwrite the hashcode and equals methods of the Category class to make sure only an unique category name exists.

    Note: in the methods hashcode and equals, we cannot directly use the instance field to check, because the proxy object can be only handled by the method invocation, not the instance field. For example, use getName() instead of this.name.

    In the BooksViewModel class, we provide 5 commands for the View to use.

    • editable: used for detail grid to be editable.
      @SmartNotifyChange("editable")
      @Command("editable")
      public void doEditable(@BindingParam("editable") boolean editable) {
      	this.editable = editable;
      }
      

      The @SmartNotifyChange is added since ZK 8.0, it means that notification is only triggered when the “editable” property has changed. Unlike @NotifyChange which triggers the notification every time.

    • cancel: used to cancel all changes. In fact, when this method is being invoked, it will trigger a NotifyChange for the “currentBook” so that the form object (a proxy Book object and its descendant) will reload the data from the original object to itself.
      @Command("cancel")
      @NotifyChange("currentBook")
      public void onCancel(@BindingParam("form") Form form) {
      	//2015/3/16 updated, this line can be omitted
      	//BindUtils.postNotifyChange(null, null, form.getFormStatus(), ".");
      }
      

      As you can see here, we manually post a NotifyChange for the form status which is used in the zul page to switch the status of the cancel button. The parameter of “form” can be either a Form interface or a Book class, we use it as a Form interface in this case.

    • save: used to save all changes from the form object to the original object and its descendants.
      @Command("save")
      @NotifyChange({"currentBook", "editable"})
      public void onSave() {
      	this.editable = false;
      }
      
    • addCategory: used to insert a new category to the form object.
      @Command("addCategory")
      public void doAddCategory(@BindingParam("form") Book form,
      	@BindingParam("cateName") String cateName) {
      	Set categories = (Set) form.getCategories();
      	categories.add(new Category(cateName));
      	//2015/3/16 updated, the following two lines can be omitted
      	//BindUtils.postNotifyChange(null, null, form, "categories");
      	//BindUtils.postNotifyChange(null, null, ((Form)form).getFormStatus(), ".");
      }
      

      The parameter of “form”, like we mentioned in the “cancel” command, is a proxy object of the “currentBook” instance of the BooksViewModel. The value returned from “form.getCategories()” is also a proxy object of the Set type for the “currentBook” instance.

      As a result we add a new category object that only affects the proxy object (Set type), not the original set in the “currentBook” instance.

    • removeCategory: used to remove a category from the form object.
      @Command("removeCategory")
      public void doRemoveCategory(@BindingParam("form") Book form,
      	@BindingParam("category") Category cate) {
      	Set categories = (Set) form.getCategories();
      	categories.remove(cate);
      	//2015/3/16 updated, the following two lines can be omitted
      	//BindUtils.postNotifyChange(null, null, form, "categories");
      	//BindUtils.postNotifyChange(null, null, ((Form)form).getFormStatus(), ".");
      }
      

      Here the concept of the removing category is the same as the “addCategory” command.

    In the zul file, there is nothing different from the past, the only new feature we add in ZK 8 is that we provide a cleanup concept for the form field within the form proxy object.

    For example,

    
    ... // omitted


    As shown above in line 11, the “fx.resetEmptyStringValue” expression is used to clean up the value of the textbox when user clicks the buttons “addCategory” or “cancel”.

    If ZK doesn’t provide these built-in methods, developer needs to declare the “getResetEmptyStringValue()” method by themselves in their own POJO object or else they will be initiated as a form proxy object.

    ZK 8 provides 9 built-in methods in the form proxy object transparently for developers to clean up the component value as follows.

    • resetEmptyStringValue: returning an empty string value
    • resetNullValue: returning a null value
    • resetByteValue: returning a byte value (0)
    • resetShortValue: returning a short value (0)
    • resetIntValue: returning an int value (0)
    • resetLongValue: returning a long value (0L)
    • resetFloatValue: returning a float value (0.0f)
    • resetDoubleValue: returning a double value (0.0d)
    • resetBooleanValue: returning a boolean value (false)
    • resetCharValue: returning a char value (‘\u0000′)

    You may have noticed in line 3 of the example above, we used “@load(1)” to switch the template, this is a trick to make it work within the current ZK version. However, we will introduced another new concept called Shadow Element to do the same thing but in a more clever, powerful, and flexible way in ZK 8.0, we will talk this topic another time, please stay tuned. :D

    Download
    You can download the whole example from github.

    Viewing all 77 articles
    Browse latest View live